All firmwares above version 56.0.0 lock the CMU so that users can no longer install tweaks.
Currently the only way to circumvent this is to make a serial connection and follow these instructions very carefully. This process will allow you to run tweaks from USB. A serial connection will need to be made before updating or FW reinstall to regain root access.
Parts/Equipment Needed:
USB to TTL Serial Adapter - (Any other CP2102 module should work. Other USB-TTL Adapters might work too.) Driver can be found Here.
If you want to have the car create its own Wifi Access Point, configure the XX/00-start-wifiAP/wifiAP.config file. Otherwise, delete the 00-start-wifiAP folder. If you are trying to remove Wifi AP after you have installed it, copy contents of Wifi Uninstall Script to flash drive and connect to CMU. (Optional) Use AIO to also install some selected tweaks on the same USB flash drive to run after completed.
Process:
Accessing the CMU:
Use our instructions to access the back of the CMU
Wiring the CMU:
Do not modify any of the below commands If the commands do not work, then you have done something wrong (i.e. you’re not logged in, or RX/TX wires are not properly wired)
You will need to have 3 wires connected to the CMU: Transmit (TX), Receive (RX), and Ground (GND)
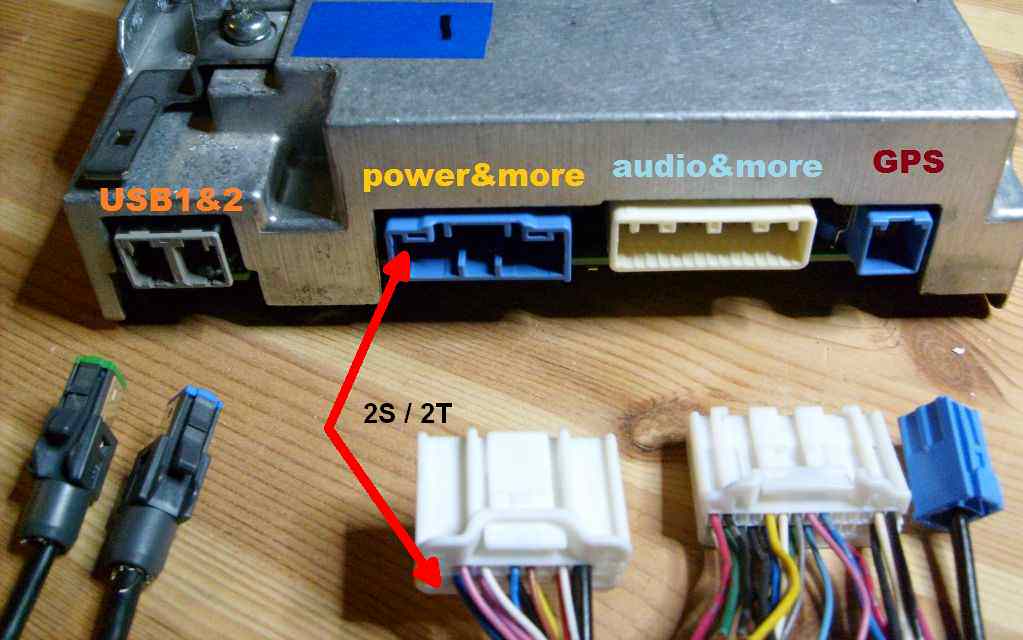
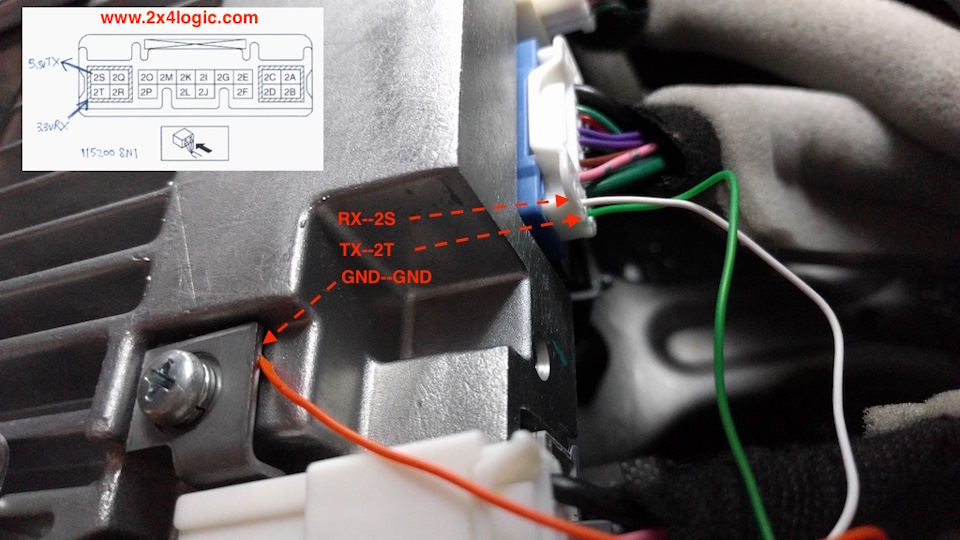
Here is a picture of the back of the CMU. We are going to be adding our cables to the ‘power&more’ connector. Here is a more detailed picture of where the RX and TX cables go. Note: The smaller 2x4logic.com diagram looks like it’s the opposite of the other picture but that’s because the CMU is using 2S to transmit (so the serial adapter will be receiving). For the sake of simplicity, connect the RX port of your Serial Adapter to 2S (top) and TX port to 2T (bottom).
Be sure that the cable is going into the port. It must go in about an inch. The GND cable can go anywhere so long as it is touching the CMU. I recommend slightly unscrewing one of the Philips head screws and wedging the cable in there.
Connect the other end of the wires to the CP2102 module in its corresponding port.
Serial Console App:
Make sure you know what the paste command is for your Serial Console application. In Putty, you right click inside the terminal window and it will paste whatever command you had copied. For SecureCRT, you push Ctrl+Shift+V to paste. Remember that these shortcuts will only paste, you will have to push enter after to actually send the command.
Windows will auto-assign a COM Port to the CP2102 module once its plugged in. Go to Device Manager > Ports (COM & LPT) to see what the COM Port # is For SecureCRT, under Options > Connection > Serial, set Port = COM#, Baud = 115200, Data Bits = 8, Parity = None, Stop Bits = 1
For Putty, you just need to select ‘Serial’ and then enter the COM Port # and set Baud to 115200
You should start see text scroll by even if the car is off
Plug in flash drive
Turn the car to ACC mode by just pressing the On button without putting your foot on brake to fully turn car on
Now you are really going to be seeing text fly by, remember that the commands are working even though you cannot see what you are typing because of the text flying by.
Press Enter in terminal and CMU will respond with ‘login’. For the next several steps make sure you do not make any spelling mistakes. It is probably best to copy and paste the commands (to paste you just need to right click in the terminal window).
If text is flying by so fast it seems like you can’t type you are doing everything correctly, copy and paste each command and press enter! It will seem like your commands are not being sent to the Mazda but don’t worry they are (provided your wiring is right. If you got a module with LEDs you can check TX is Transmit/RX is Receive)
Reboot Mazda CMU by holding the Nav + Mute button for 10+ seconds.
Input userand push Enter
Input jci and push Enter
NOTE: After installing the autorun scripts you will be able to login as the root user with username: cmu pass: jci
Run cp -r /mnt/sd*/XX/* /mnt/data_persist/dev/bin/; chmod +x /mnt/data_persist/dev/bin/autorun; /mnt/data_persist/dev/bin/autorun
(Optional) To test if the files have been moved to the folder, run ls -l /mnt/data_persist/dev/bin
The files/folders should be colored in green/blue since they are folders/executable. You may have to run this a few times to see the Serial Console output.
Remove flash drive, turn off car, insert flash drive that has AIO tweaks installed, turn car on back in ACC mode
After a few minutes, you should see a message that indicates the mods are being installed. This process may take approximately 2 - 20 minutes.
Finishing Up
Now that everything is installed you can put everything back together
Remove the TX, RX, GND wires
Slide CMU back in
Attach bolt using 10mm socket wrench
Connect hazard light connector cable to trim
Push trim back in
From here on out, you can just use a flashdrive to install tweaks
NOT TO BE FOLLOWED IF FITTING APPLE CARPLAY / ANDROID AUTO
NOTE: These instructions are *ONLY* designed to be used on UK-specification Fiat & Abarth 124 Spiders which are running firmware version 56.00.530. This update procedure is *NOT* suitable for Apple CarPlay / Android Auto installation.
Follow these instructions to perform the CMU upgrade process. It is imperative these instructions are followed precisely:
Ensure you have the software update files (not provided in this document) stored in the root folder of a USB memory stick.
Remove Navigation SD card (if customer has one) and all other devices (USB, AUX, Mobile phones. …) connected to the car when ignition position is OFF.
Push engine start button once without depressing clutch pedal (manual transaxle) or brake pedal (automatic transaxle). This will set ignition to ACC. Wait until the CMU has booted.
Select AM, FM or DAB radio.
Press three buttons (Music (A) + Favourite (B) + Volume Mute (C)) on the commander switch at the same time for 2-5 seconds and the Diagnostic Test Screen will appear.
Use the touchscreen or the commander knob to input ‘3’ on test screen and then select “ENTER” and “CLEAR”.
Input ‘2’ on test screen and then select “ENTER”. (This will internally clear earlier set DTCs in CMU). Select “CLEAR” and then “EXIT”.
Switch ignition OFF, close all doors (regardless bonnet), lock vehicle with remote, keep all remote transmitters 5 m or more away from the vehicle, and wait for 3 minutes (CMU sleep mode).
Unlock the vehicle and press the START/STOP ENGINE push button once without depressing the clutch pedal (manual transaxle) or the brake pedal (automatic transaxle), to switch the ignition position to ACC.
Connect the USB memory stick to the top USB port in your car. * Nothing should be inserted in the other USB port and SD slot during the re-flashing process. *
Press again the three buttons (Music (A) + Favourite (B) + Volume Mute (C)) on commander switch at the same time for 2-5 seconds
Use touchscreen or commander knob to input ‘99’ and then select “ENTER” on Diagnostics Test screen.
Select “Search” on screen below.
Select “Fail Safe Package” first.CAUTION: Always do the “Fail Safe Package” first. (you will see different version numbers displayed
* Please DO NOT switch ignition OFF or allow system to switch off ignition automatically until all updates have been installed.
** Stay inside the vehicle until failsafe package installation is finished. *
Select “Install” on the screen below and the Failsafe installation process will start.
Failsafe installation process will start and will take several minutes.
After Failsafe installation process is completed, select “OK”
Press and release clutch pedal (Manual Transaxle) or brake pedal (Automatic Transaxle) and proceed with following steps without stopping.
Press the three buttons (Music (A) + Favourite (B) + Volume Mute (C)) on commander switch at the same time for 2-5 seconds to open the Diagnostics Test screen again.
Use touchscreen or commander knob to input ‘99’ and then select “ENTER” on Diagnostics Test screen.
Select “Search” on screen below.
Select “Reinstallation Package” on the screen below. (you will see different version numbers)
Select “Install” on the screen below.
Screen below will be displayed.
“Preparing to update”→“black screen”→“White screen”.
This will take several minutes.Reinstallation / Update will start from 0% and during the update process, the progress bar will gradually increase to 100%. It will take about 40 minutes. * DO NOT turn Ignition OFF to avoid damaging CMU. *
In order to avoid ACC power being turned off during update process, press and release clutch pedal (Manual Transaxle) or brake pedal (Automatic Transaxle) after approx. 25 minutes. We strongly recommend to set a timer to 20 minutes.
Confirm that update is completed and turn ignition switch


 * Nothing should be inserted in the other USB port and SD slot during the re-flashing process. *


 * Please DO NOT switch ignition OFF or allow system to switch off ignition automatically until all updates have been installed.


